
Receipts are receipts of income into the council. For a parish or town council, the largest receipt or source of income is generally the precept, but other receipts may include revenue generated from council services like hall rentals, allotments, cemeteries, and car parks or funding received from outside sources, such as grants as well as bank interest or VAT refunds.
Receipts can be received in many ways, including cash, cheques, electronic funds transfer, and credit card. It is important for a council to keep accurate records of these transactions to effectively manage its finances and ensure sufficient funds are available to meet ongoing expenses and fund new projects.
Read Receipt And Payment Accounting For Parish Councils for more detail
Receipts within Scribe Accounts
Scribe Accounts has a specific transaction type called Receipts, which supports standard details about your transaction, including details specific to parish and town councils, such as payment & minute references.
The transactions will also conveniently feed (mainly Box 3) into the Annual Governance & Accountability Return (AGAR).
Where are receipts within Scribe Accounts?
Log into Scribe Accounts and navigate to menu Transactions → Receipts. Alternatively click here
Watch our Scribe Bytesize video on how to add transactions
How to Add a Receipt
- Log into Scribe Accounts and navigate to menu Transactions → Receipts.
- All entries for the current year will be listed with the most recent entry shown at the top.
- Click the + button to add a new record, or under the Edit button in the top right-hand corner, select Add Record.
- The entry screen will appear showing the unique voucher number allocated to the transaction (voucher numbers reset each financial year).
- Complete the required fields (asterisk
*denotes mandatory fields):
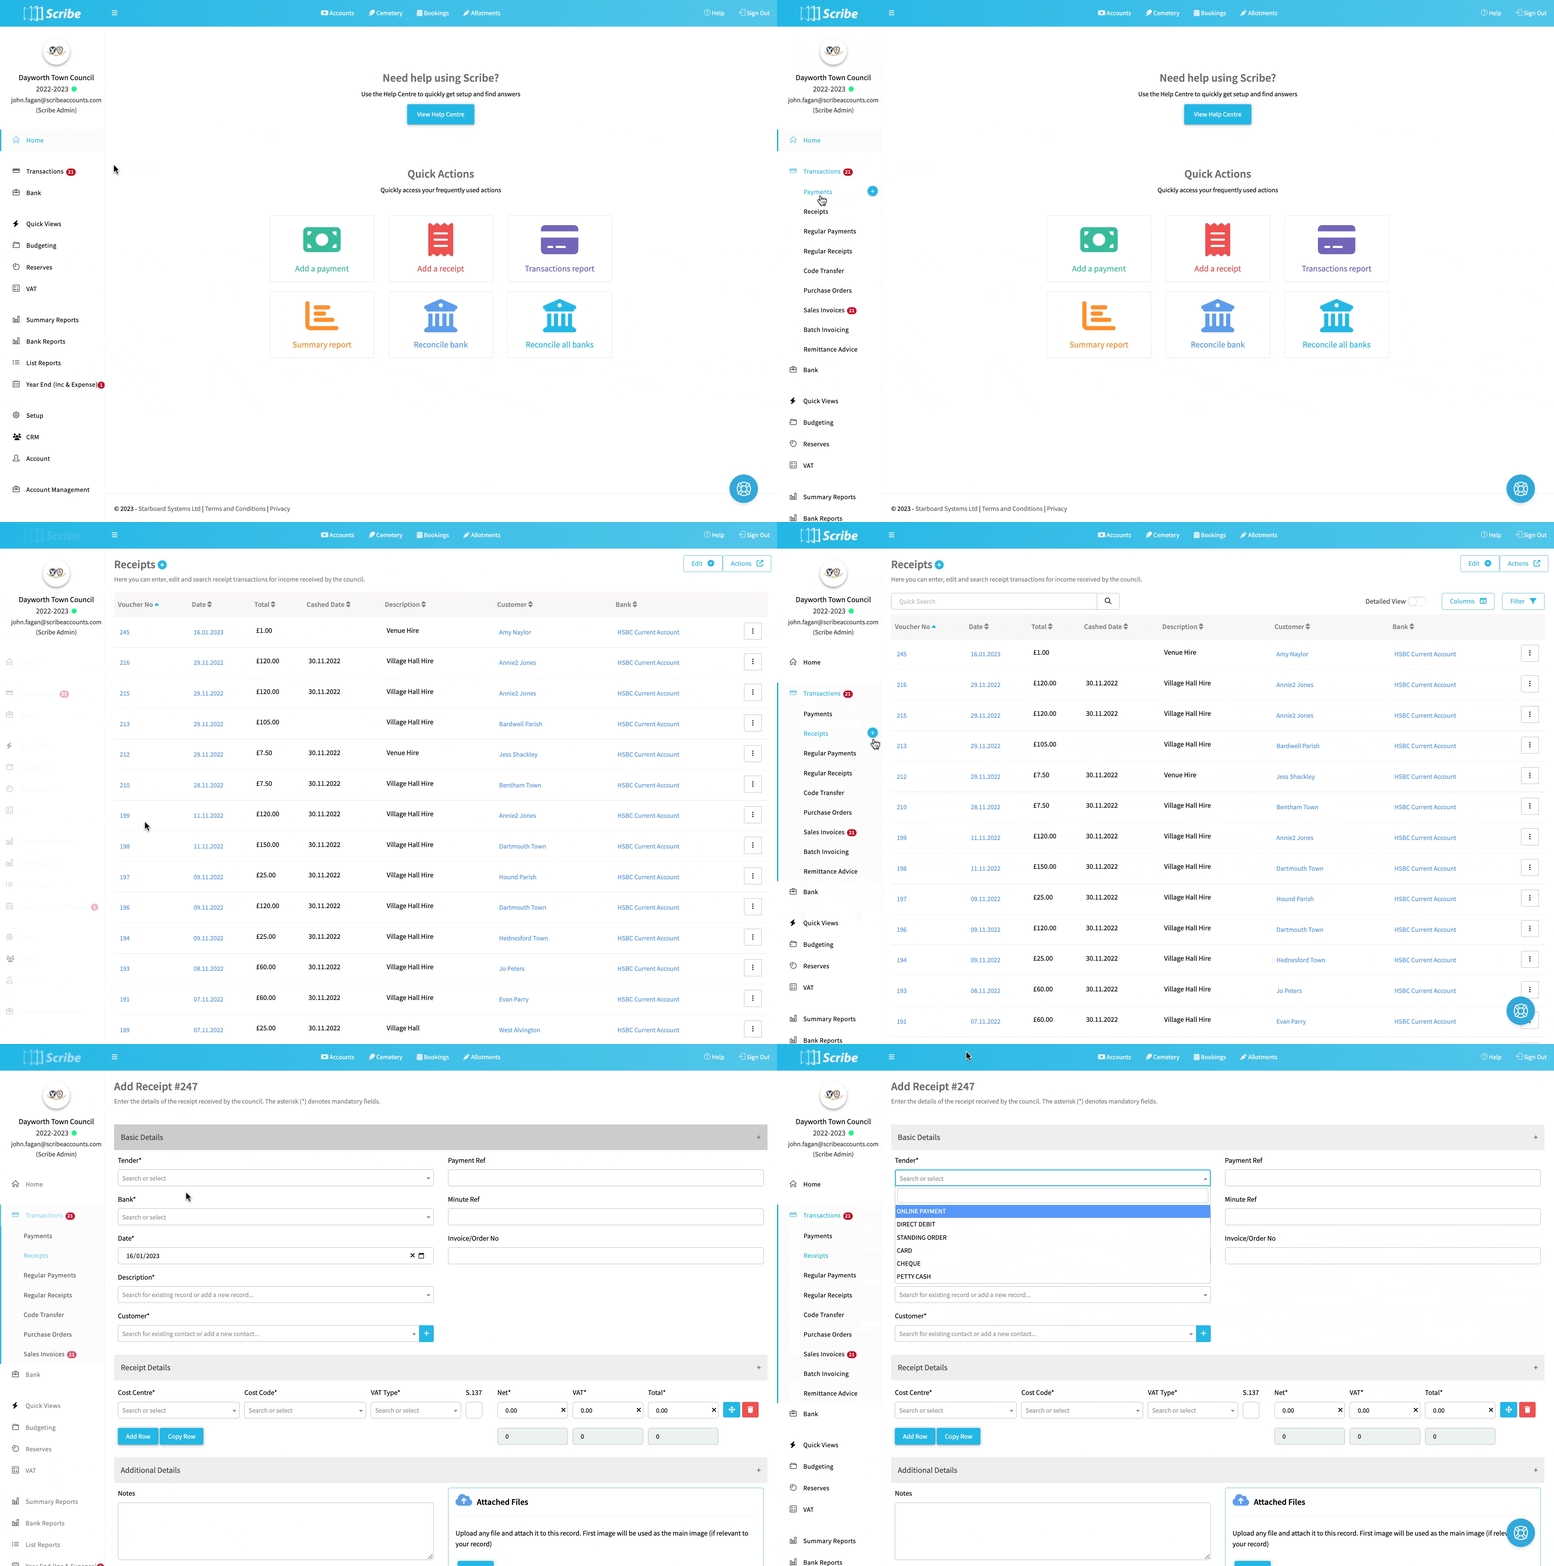
The entry screen will appear showing the unique voucher number allocated to the transaction. The voucher numbers are reset each financial year so the first entry of a new year will always be #1.
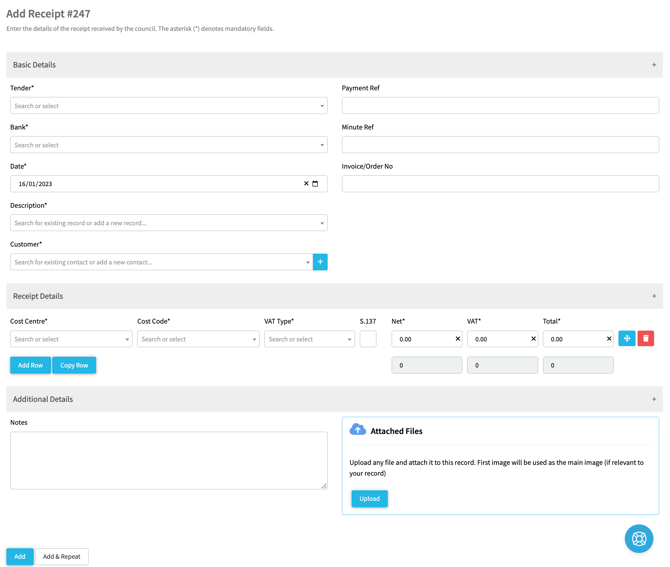
| Field | Tips |
| Tender* | How payment is received. Select from Online Payment (e.g. BACS), Direct Debit, Standing Order, Card, Cheque, Petty Cash or Bank Credit (paying in of cash or cheques). |
| Bank* | Select the bank account payment is received into. If you have selected Petty Cash as the Tender the Bank field will disappear as it is not relevant in this case. |
| Date* | The date income is received |
| Description* | A description of the income (e.g. bank interest, CiL). Select an existing description from the drop down list or select Create New to add a new description. |
| Customer* | Select an existing customer from the drop down list or click the "+" button to add a new customer and enter relevant details. |
| Payment ref | A reference relating to the receipt can be recorded here if necessary (e.g. cheque number). |
| Minute ref | If applicable |
| Invoice/Order No | Enter your invoice number or customer's PO number. When converting an invoice to a receipt, Scribe will prefill this field with the invoice no. |
| Cost Centre* | Select the cost centre from the dropdown list |
| Cost Code* | Select the cost code from the drop down list. Further rows can be added where different cost codes or VAT rates apply. |
| VAT Type* | Select from the pre-filled VAT types that which applies to the receipt (Outside Scope, Standard, Exempt etc). |
| S.137 | Check the box if you wish to flag the transaction as under Section 137 (reports can be run on the transactions against which this box is ticked). |
| Net* | Enter the net value |
| VAT* |
Will automatically be calculated based on VAT rate selected and net amount |
| Total* | Will automatically be calculated based on VAT rate selected and net amount |
| Notes | Can be added if you want to enter more information than you have been able to enter under description. |
| Attached Files | Click Upload to select files to save against the record (e.g. the customer PO). |
Splitting Transactions: When adding a receipt for the same customer but needs to be split across multiple cost centres or cost codes, you can add new rows in the same entry by clicking Add Row. Ensure that the total of the line items matches what was actually received.
Once checked, click Add to save or Add & Repeat to save and duplicate the entry structure for similar batch transactions.
How to Edit a Receipt
- Navigate to Transactions → Receipts.
- On the entry you want to edit, click the three dots and select Edit.
- Make the required changes and click Save.
Note: Edits should generally only be made to receipts entered in the current month. Editing reconciled transactions from prior months may affect past figures and cause reconciliation differences.
How to Bulk Edit Receipts
Bulk Edit can only be used to amend descriptive elements (Date, Description, Customer, Notes, or Minute Ref):
- Navigate to Transactions → Receipts.
- Locate your receipt using search/filter.
- Click Edit → Bulk Edit.
- Select the check boxes for the transactions you wish to edit.
- Click Edit Selection, make your changes, and click Save.
How to Delete Receipts
To preserve the audit trail, transactions cannot be directly deleted. If an entry is a duplicate or no longer required, edit the receipt and zero out the amounts. Add a note explaining why (e.g., "Duplicated entry").
If a receipt was entered as a payment, zero out the original transaction and re-enter it as a payment.
How to Find Receipts & Reports
- Quick Search/Filter: Navigate to Transactions → Receipts to use list search and filter tools. See Searching, Sorting & Filtering Records Lists for more details.
- Reports: To review multiple transactions across accounts, generate a report via the Reports menu. See Transaction Reports.