Managing Users in Scribe Accounts
This guide explains how to:
- Add a new user
- Assign permissions based on user roles
- Set access duration (including temporary access)
- Reset passwords
- Remove or revoke user access
⚠️ Important: User management must only be carried out by authorised administrators. This ensures proper access control and supports your council's compliance with Assertion 10 of the Practitioners' Guide 2025 IT Policy Requirement and good information security practices.
Who Can Use This Guide
This process applies to:
- Clerks
- Responsible Financial Officers (RFOs)
- Other authorised council administrators
Note: You must have admin-level access to perform these steps (Council: Users/Editor Permissions).
Prerequisites
Before adding a user, ensure you have:
- Administrator access in Scribe.
- The new user's full name and email address.
- A clear understanding of which permissions they require.
- (Optional) An expiry date for temporary access.
📧 Email Requirements: In line with Assertion 10 of the Practitioners' Guide 2025 (Para 1.47), every user should use a council-owned domain email (e.g.,
clerk@abcparishcouncil.gov.uk) rather than a personal email provider (e.g., Gmail or Outlook).
How to Add a New User
- Log in to Scribe Accounts with your administrator credentials.
- Navigate to Account → Users.
- Review the existing list to ensure the user doesn't already exist.
- Click the Plus (+) button or select Edit → Add Record.
- Complete the user details:
- User Name: Enter their full name.
- Email Address: Use a official council email as outlined in the prerequisites.
- Set the user's access duration:
- To give unlimited access, leave the Unlimited box ticked.
- For temporary access, untick Unlimited and enter an Expiry Date.
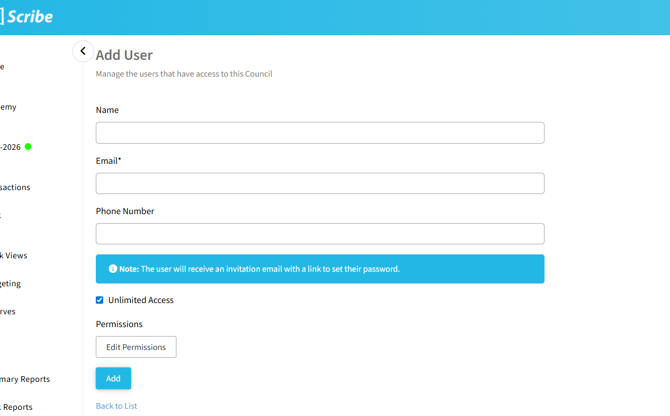
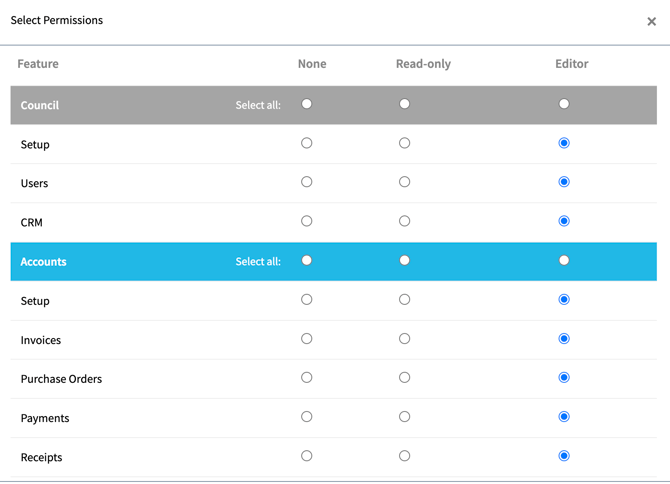
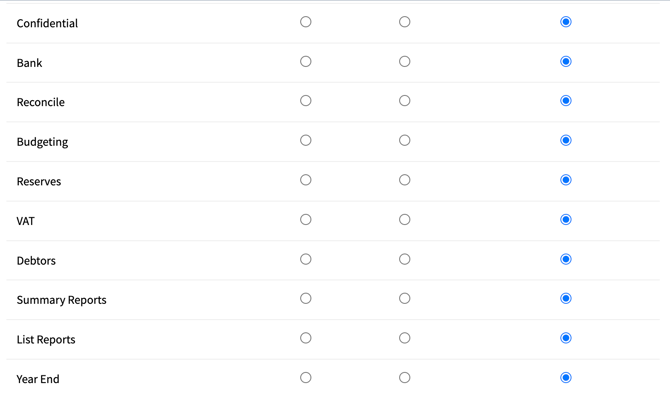
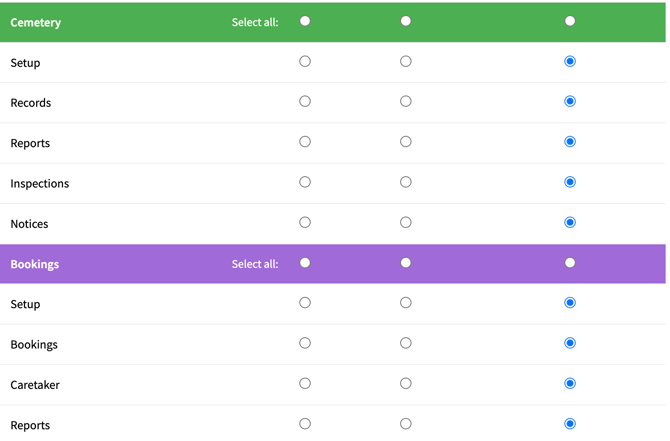
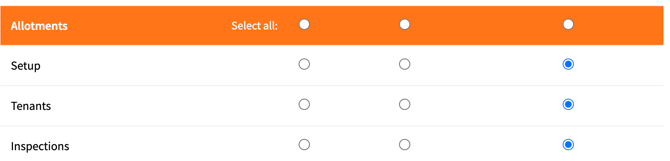
- Set the appropriate permissions for each module:
- Click Edit Permissions.
- Choose between: Editor, Read Only, or None.
- Click Done once all permissions are set.
ℹ️ Please note: "Bulk" selecting None will either remove the user's access from the system or prevent a new user from being added.
-
Click Add to create the user.
- An invitation email will automatically be sent to the new user. They must follow the link to activate their account and set a password.
- The user will appear with a Pending status until they accept the invitation and create a password, at which point refreshing the page will update their status to Authorised.
✅ Double-check their access and permissions are correct.
Available Roles:
🔐 How to Reset a User’s Password
- Navigate to Account → Users.
- Find the user in the list.
- Click the three dots beside their name.
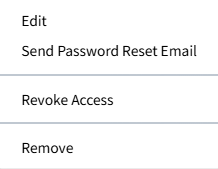
- Select Send Password Reset Email.
- An email will be sent to the user with instructions to reset their password.
🛑 How to Revoke or Remove a User
From the same menu (the three dots next to the user's name), you can also:
- Revoke Access: Immediately disable their login access.
- Remove User: Permanently delete the user from the system.
📝 Notes & Best Practice
- Review users regularly, especially at the end of a clerk or RFO's term.
- Set expiry dates for temporary staff or contractors.
- Ensure permissions match the user's role—use Read Only for auditors or councillors, and Editor for operational staff.
- In line with Assertion 10 (Paragraph 1.54), always follow your council's information security policy when managing users.