Parish and Town Councils may have a number of different bank accounts which need to be reconciled individually. This process helps identify discrepancies, such as missing transactions, bank charges, or direct debits, and ensures the council's financial records are up-to-date and accurate.
Once all bank accounts have been reconciled individually, you can reconcile all banks to provide a comprehensive check on your overall bank position.
Reconciling All Banks within Scribe Accounts
Scribe Accounts has a specific function called 'Reconcile All Banks'. This is a highly important feature; not only does it give you a clear picture of your total council bank position, but it is also an excellent, clean report to take along to your council meetings.
Where is the Reconcile Function Within Scribe Accounts?
Log into Scribe Accounts and navigate to the menu: Bank → Reconcile All Banks Bank → Reconcile All Banks alternatively click here
How to Generate a Bank Reconciliation
- Log into Scribe Accounts and navigate to menu Bank → Reconcile All Banks.
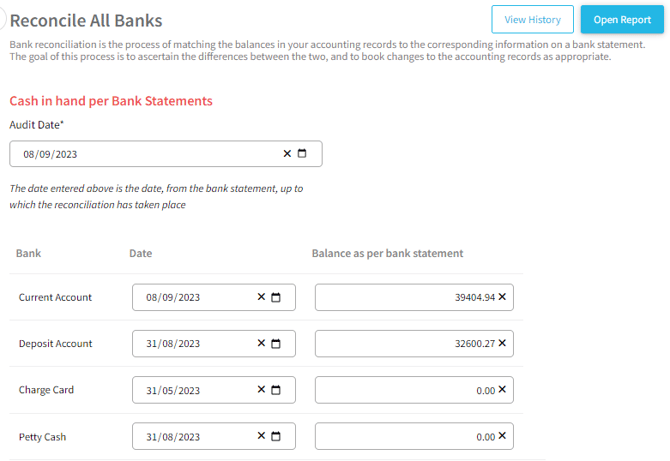
- Enter the Audit Date: This should be the date you have just reconciled your individual bank accounts to (usually the month-end date). The date you select determines which transactions are counted in the top half of the report (related to the accounts) and which unpresented cheques (if any) are counted in the bottom half of the report (relating to the bank statements). The report always runs from the start of the financial year up to the date you enter.
- Enter Statement Dates & Balances: Your bank accounts will show in the list. Click into 'Date' and enter the dates of the statements you have reconciled. Then, click into 'Bank Statement Amount' and enter the figures from your statement (and the latest balance for the Petty Cash account, if relevant).
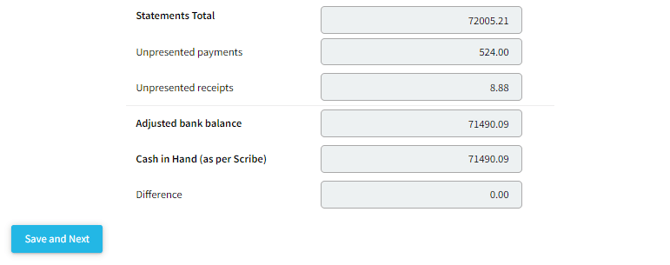
- Review the Balances: The greyed-out boxes at the bottom of the screen will update automatically based on the balances entered. The total of your statements will be adjusted for any unpresented items and compared against the Scribe balance.
💡 Important Note on the Difference Column: If your reconciliation balances, the Difference will show as 0.00.
Occasionally, individual or 'reconcile all' banks will show a difference of -0.00. This is a harmless system calculation quirk caused by behind-the-scenes decimal rounding. A -0.00 reading still means your accounts balance perfectly! You can safely ignore the minus sign and proceed as normal.
If the difference is any other number (e.g., 0.01 or higher), your accounts do not balance. Please check the Audit Date and statement balances you have entered, or refer to our troubleshooting guide: Why don't the accounts reconcile with the bank?
Run the Report: If you wish to view the report, click Save and Next and the report will run.
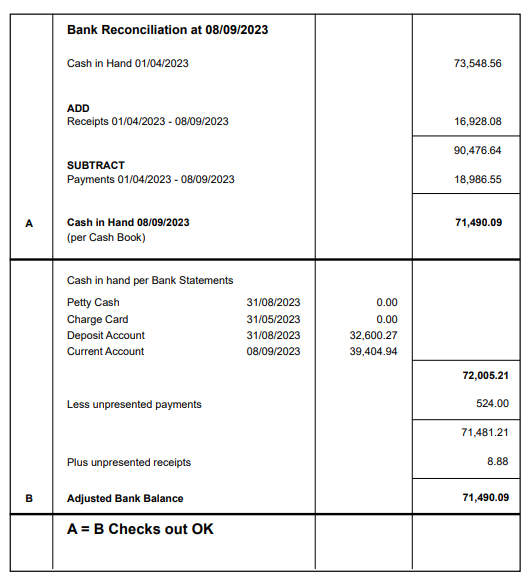
- The report will show the opening balance (as of 1st April), adjusted for the total receipts received and payments made during the period, giving a Cash in Hand figure as per the Audit Date entered (A).
- The bottom section of the report takes the total of the bank statements and adjusts for unpresented cheques (both receipts and payments) to give an Adjusted Bank Balance (B).
- These figures should balance. If they do, it will state "A = B Checks out OK" (even if the screen showed a
-0.00difference).
📌 Tip: Reviewing Unpresented Items
Having run your Reconcile All Banks Report, use the "Filter" option in the top right corner and change the Show dropdown from "Summary" to "Uncashed Payments" or "Uncashed Receipts". You should review your unpresented items regularly to see if any have been missed or need to be written off.
Save Report
It is highly recommended to click Save Report to create a reconciliation summary record. This retains the statement balances entered, a copy of the Reconcile All Banks report, and details of unpresented items against which you can upload your bank statements. Ideally, this should be done on a monthly basis.
- When the report has been produced, click Save Report. (Note: If your difference was
-0.00, the system recognizes this as balanced and will allow you to save and view the report as normal without any error blocks). If a genuine discrepancy exists and the difference is not zero, a warning message will appear asking you to confirm if you still wish to save. - The Reconcile All Banks Summary screen will appear, listing all balances including individual bank statement balances.
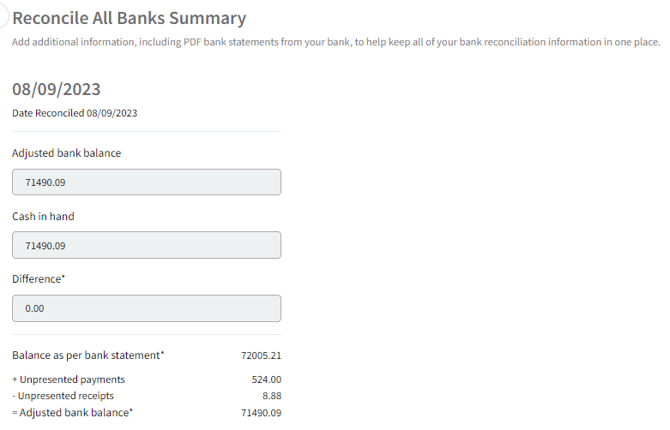
- Attach Bank Statements: Under Attach Files, the Reconcile All Banks report and Uncashed Reports will be automatically locked to the record. You can upload and attach the accompanying PDF bank statements here to keep all your records in one place. (Note: File attachment is not available on Scribelite).
- Click Save to finalize the summary record.
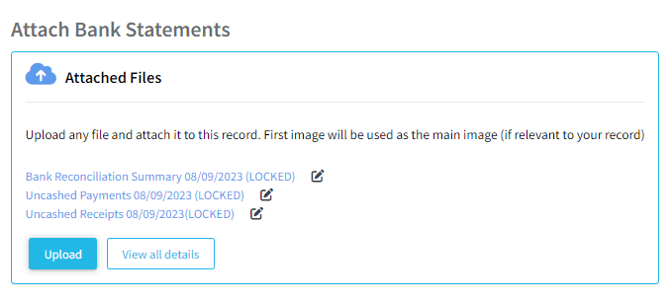
- Click Save to create the summary record.
- The record will be listed in the Reconcile All Banks - History screen along with any previously saved records. This screen can be accessed by selecting View History when on the first screen of Reconcile All Banks.
- The options for each record are as follows (accessible by clicking the three little dots):
- Edit - to view the details of the reconciliation and attach or remove files.
- Rerun - to populate the Reconcile All Banks screen with the statement balances saved in the record. This can be useful to check whether previously balancing reconciliations still balance. If they do not the report produced can be compared against the saved report to identify what has changed.
- Delete - to remove the record and all attached files. A warning message will pop up if this option is selected as it may not be possible to re-run the Reconcile All Banks report retrospectively.
History & Filter Options
Managing Your History
Saved records are listed in the Reconcile All Banks - History screen (accessed via the View History button on the main screen). Clicking the three dots next to a record gives you three options:
- Edit: View reconciliation details, or attach/remove files.
- Rerun: Repopulate the reconciliation screen with saved balances. This is useful for checking if historically balanced months still balance. If they no longer match, you can compare the new report against the saved version to see what altered.
- Delete: Removes the record and files. A warning will appear, as you may not be able to re-run the report retrospectively.
Filter Options
Clicking Filter allows you to view your unpresented items:
- Show: Switch between 'Summary' (the full report), 'Uncashed Payments', or 'Uncashed Receipts'.
- Order By: Sort transactions by 'Voucher Date' or 'Voucher Number'.
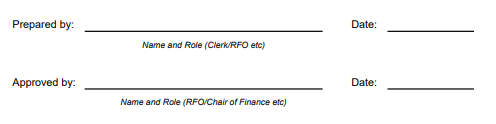
- Show approval signature: Adds formal sign-off lines to the bottom of the Summary report for your Clerk, RFO, or Chair of Finance to sign and date.
How to Download, Print, or Share a Reconcile All Banks Report
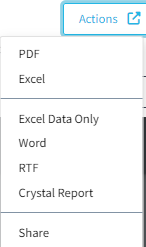
- Download: Click Actions in the top corner of the screen. You can export the report to PDF or Excel (most common), as well as Word, RTF, or Crystal Reports.
- Share: Clicking Share creates a live web link that opens the report PDF directly in a separate webpage.
- Print: Select the printer icon at the top right corner of the report screen.